Types of Ties

A comprehensive guide to tying a Bow Tie necktie knot and others from Ties.com

About the Four-In-Hand Knot Named after a 19th Century Gentleman's Club of the same name, the Four-in-Hand is the reigning champion of necktie knots. Its popularity stems from its simplicity and versatility.

About the Windsor Knot Although the Duke of Windsor never specifically used the Windsor knot, he did favor a wide triangular knot. In actuality, the Duke achieved his trendsetting look by tying a Four-in-Hand with specially made wide and extra thick ties.
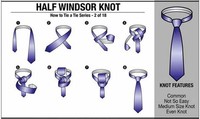
The Half Windsor knot is an extremely versatile knot. Unlike what the name suggests, the Half Windsor knot is actually closer to three-quarters the size of the Windsor knot. The Half Windsor is medium in size, nearly symmetrical and, when tied correctly, it produces a deep and substantial dimple.

About the Kelvin Knot The Kelvin necktie knot is named after Lord Kelvin (William Thomson, 1824-1907) a mathematical physicist who contributed to the theory of knots in relation to atomic structure. The Kelvin is an extension of the Simple knot.

How to Tie a Nicky Knot. Instructions for Tying a Nicky Knot. The instructions for tying a Nicky knot are shown below. We assume that you are right-handed in the following instructions. The figures below are mirror images. They are what you will see if you stand in front of a mirror. 1. At the beginning, the wide end of the tie should be on your right side and the other end should be on your left side. Note that the tie should begin inside out.

The Simple Knot (Oriental Knot) Tying Instructions. 1. Start with the backside of the tie facing away from you, the wide end is on the right and the small end is on the left. The tip of the small end should rest slightly above your belly-button (this will vary depending on your height and the length & thickness of your tie). Move only the active (wide) end.

The Pratt Knot (Shelby Knot) Tying Instructions. 1. Begin with the backside of your tie facing forward, the wide end of the tie on the right and the small end on the left.